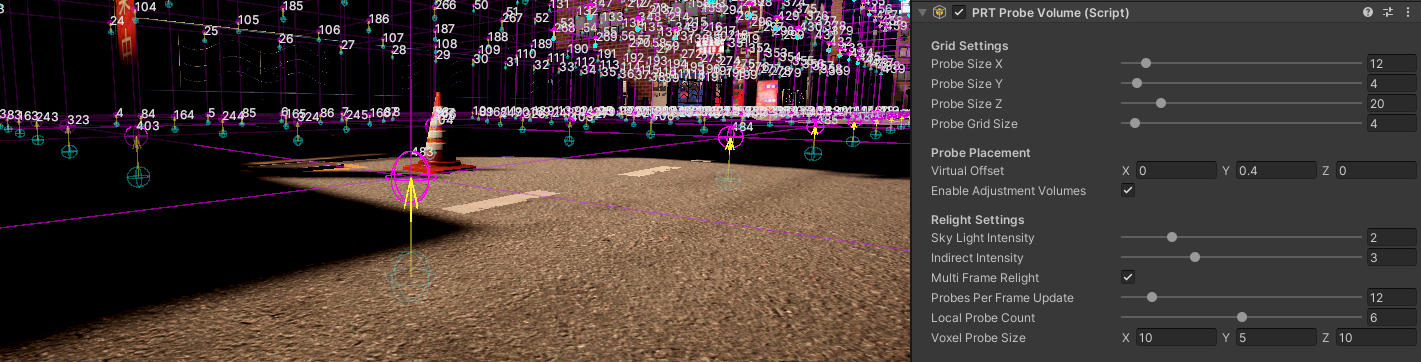
privatevoidCalculateCameraBoundingBox(){if(!_mainCamera||Probes==null||Probes.Length==0)return;Vector3cameraPos=_mainCamera.transform.position;// Convert camera position to grid coordinates relative to Volume corner// Volume position is the corner (0,0,0) of the probe gridVector3gridPos=(cameraPos-transform.position)/probeGridSize;// Calculate the maximum valid bounding box position for each axisintmaxX=Mathf.Max(0,probeSizeX-_grid.X);intmaxY=Mathf.Max(0,probeSizeY-_grid.Y);intmaxZ=Mathf.Max(0,probeSizeZ-_grid.Z);// Calculate ideal bounding box center (grid coordinates)Vector3IntidealCenterGrid=newVector3Int(Mathf.RoundToInt(gridPos.x),Mathf.RoundToInt(gridPos.y),Mathf.RoundToInt(gridPos.z));// Calculate ideal bounding box minimum cornerVector3IntidealBoundingBoxMin=newVector3Int(idealCenterGrid.x-_grid.X/2,idealCenterGrid.y-_grid.Y/2,idealCenterGrid.z-_grid.Z/2);Vector3IntnewBoundingBoxMin=FindClosestValidBoundingBox(cameraPos,idealBoundingBoxMin,maxX,maxY,maxZ);// Check if bounding box has changedintnewHash=newBoundingBoxMin.GetHashCode();if(newHash!=_lastBoundingBoxHash){_boundingBoxMin=newBoundingBoxMin;_lastBoundingBoxHash=newHash;_boundingBoxChanged=true;// Update bounding box world coordinatesVector3worldMin=transform.position+newVector3(_boundingBoxMin.x*probeGridSize,_boundingBoxMin.y*probeGridSize,_boundingBoxMin.z*probeGridSize);Vector3worldSize=newVector3(_grid.X*probeGridSize,_grid.Y*probeGridSize,_grid.Z*probeGridSize);_currentBoundingBox=newBounds(worldMin+worldSize*0.5f,worldSize);}else{_boundingBoxChanged=false;}}
uint3ProbeIndexToTexture3DCoord(uintprobeIndex,uintshIndex,float4voxelSize,float4boundingBoxMin){// Convert probe index to voxel 3D grid coordinatesuintprobeSizeY=uint(voxelSize.y);uintprobeSizeZ=uint(voxelSize.z);uintx=probeIndex/(probeSizeY*probeSizeZ);uinttemp=probeIndex%(probeSizeY*probeSizeZ);uinty=temp/probeSizeZ;uintz=temp%probeSizeZ;// 注意这里为了减少计算,是在转纹理坐标前计算BoundingBox内的相对坐标uint3bboxCoord=uint3(x,y,z)-uint3(boundingBoxMin.xyz);// Convert to 3D texture coordinatesuint3texCoord;texCoord.x=bboxCoord.x;texCoord.y=bboxCoord.z;// Z becomes Y in texturetexCoord.z=bboxCoord.y*9+shIndex;// Y * 9 + SH indexreturntexCoord;}
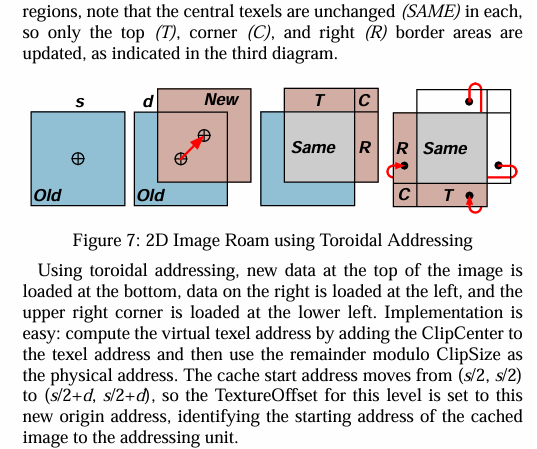
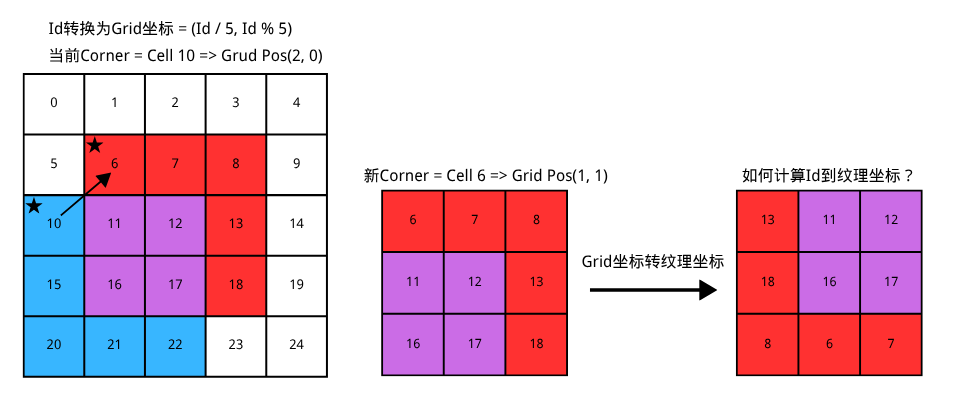
intWrapInt(intidx,intlength){return(idx%length+length)%length;}int3WrapInt3(int3idx,int3length){returnint3(WrapInt(idx.x,length.x),WrapInt(idx.y,length.y),WrapInt(idx.z,length.z));}// Convert probe grid 3D coordinates to 3D Texture coordinatesint3GetProbeTexture3DCoordFrom3DCoord(int3probeCoord,uintshIndex){returnint3(probeCoord.x,probeCoord.z,probeCoord.y*9+shIndex);}// Convert probe index to 3D texture coordinatesuint3GetProbeTexture3DCoordFromIndex(uintprobeIndex,uintshIndex,float4voxelSize,float4boundingBoxMin,float4boundingBoxSize,float4originalBoundingBoxMin){// Convert probe index to 3D grid coordinatesuintprobeSizeY=uint(voxelSize.y);uintprobeSizeZ=uint(voxelSize.z);uintx=probeIndex/(probeSizeY*probeSizeZ);uinttemp=probeIndex%(probeSizeY*probeSizeZ);uinty=temp/probeSizeZ;uintz=temp%probeSizeZ;#ifdef TOROIDAL_ADDRESSING// Calculate relative coordinates within original bounding boxint3bboxCoord=int3(x,y,z)-int3(originalBoundingBoxMin.xyz);// Toroidal AddressingbboxCoord=WrapInt3(bboxCoord,boundingBoxSize.xyz);#else// Calculate relative coordinates within current bounding boxuint3bboxCoord=uint3(x,y,z)-uint3(boundingBoxMin.xyz);#endif// Convert to 3D texture coordinatesuint3texCoord=GetProbeTexture3DCoordFrom3DCoord(bboxCoord,shIndex);returntexCoord;}
[numthreads(32,16,1)]voidCSMain(uint3id:SV_DispatchThreadID,uintgroupIndex:SV_GroupIndex){float2xy=float2(id.x,id.y)/float2(32,16);xy+=float2(1,1)*_randSeed;floatu=rand(xy*1.0);floatv=rand(xy*2.0);float3dir=UniformSphereSample(u,v);floatweight=4.0f*PI/ThreadCount;float3lighting=_InputCubemap.SampleLevel(sampler_point_clamp,dir,0).rgb;floatshCoeffs[9];EvaluateSH9(dir,shCoeffs);// Process each SH coefficientUNITY_UNROLLfor(intshIndex=0;shIndex<9;shIndex++){float3contribution=shCoeffs[shIndex]*lighting*weight;groupCoefficients[groupIndex]=contribution;GroupMemoryBarrierWithGroupSync();// Parallel reduction for non-power-of-2 sizefor(uintstride=ThreadCount/2;stride>0;stride>>=1){if(groupIndex<stride){groupCoefficients[groupIndex]+=groupCoefficients[groupIndex+stride];}GroupMemoryBarrierWithGroupSync();}// Write resultsif(groupIndex==0){_coefficientSH9[shIndex*3+0]=groupCoefficients[0].x;_coefficientSH9[shIndex*3+1]=groupCoefficients[0].y;_coefficientSH9[shIndex*3+2]=groupCoefficients[0].z;}GroupMemoryBarrierWithGroupSync();}}
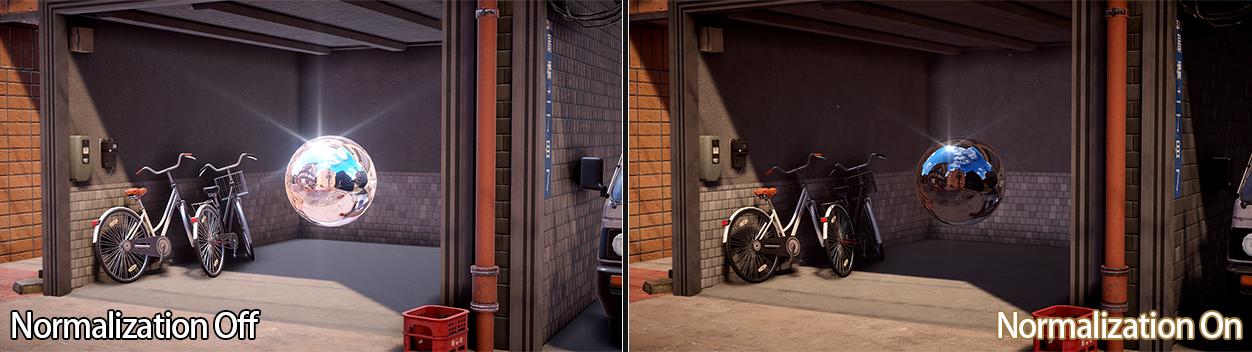
publicboolTryGetSHForNormalization(outVector4outL0L1,outVector4outL2_1,outfloatoutL2_2){if(!hasValidSHForNormalization){// No valid data, so we disable the feature.outL0L1=outL2_1=Vector4.zero;outL2_2=0f;returnfalse;}if(shForNormalization[0,0]==float.MaxValue){// Valid data, but probe is fully black. Setup coefficients so that light loop cancels out reflection probe contribution.outL0L1=newVector4(float.MaxValue,0f,0f,0f);outL2_1=Vector4.zero;outL2_2=0f;returntrue;}varL0=SphericalHarmonicsL2Utils.GetCoefficient(shForNormalization,0);varL1_0=SphericalHarmonicsL2Utils.GetCoefficient(shForNormalization,1);varL1_1=SphericalHarmonicsL2Utils.GetCoefficient(shForNormalization,2);varL1_2=SphericalHarmonicsL2Utils.GetCoefficient(shForNormalization,3);varL2_0=SphericalHarmonicsL2Utils.GetCoefficient(shForNormalization,4);varL2_1=SphericalHarmonicsL2Utils.GetCoefficient(shForNormalization,5);varL2_2=SphericalHarmonicsL2Utils.GetCoefficient(shForNormalization,6);varL2_3=SphericalHarmonicsL2Utils.GetCoefficient(shForNormalization,7);varL2_4=SphericalHarmonicsL2Utils.GetCoefficient(shForNormalization,8);// To evaluate L2, we need to fixup the coefficients.L0-=L2_2;L2_2*=3.0f;outL0L1.x=ColorUtils.Luminance(newColor(L0.x,L0.y,L0.z));outL0L1.y=ColorUtils.Luminance(newColor(L1_0.x,L1_0.y,L1_0.z));outL0L1.z=ColorUtils.Luminance(newColor(L1_1.x,L1_1.y,L1_1.z));outL0L1.w=ColorUtils.Luminance(newColor(L1_2.x,L1_2.y,L1_2.z));outL2_1.x=ColorUtils.Luminance(newColor(L2_0.x,L2_0.y,L2_0.z));outL2_1.y=ColorUtils.Luminance(newColor(L2_1.x,L2_1.y,L2_1.z));outL2_1.z=ColorUtils.Luminance(newColor(L2_2.x,L2_2.y,L2_2.z));outL2_1.w=ColorUtils.Luminance(newColor(L2_3.x,L2_3.y,L2_3.z));outL2_2=ColorUtils.Luminance(newColor(L2_4.x,L2_4.y,L2_4.z));returntrue;}privatestructReflectionProbeData{publicVector4L0L1;publicVector4L2_1;// First 4 coeffs of L2 {-2, -1, 0, 1}publicfloatL2_2;// Last L2 coeff {2}}
#if defined(DYNAMICLIGHTMAP_ON)inputData.bakedGI=SAMPLE_GI(IN.lightmapUVOrVertexSH.xy,IN.dynamicLightmapUV.xy,SH,inputData.normalWS);#elseinputData.bakedGI=SAMPLE_GI(IN.lightmapUVOrVertexSH.xy,SH,inputData.normalWS);#endifinputData.bakedGI=SAMPLE_PROBE_VOLUME(inputData.positionWS,inputData.normalWS,inputData.bakedGI);#if _PRT_GLOBAL_ILLUMINATION_ON#define SAMPLE_PROBE_VOLUME(worldPos, normal, bakedGI) SampleProbeVolume(worldPos, normal, bakedGI)#else#define SAMPLE_PROBE_VOLUME(worldPos, normal, bakedGI) bakedGI#endif// Evaluate SH coefficients from 3D texturefloat3EvaluateProbeVolumeSH(infloat3worldPos,infloat3normal,infloat3bakedGI,inTexture3D<float3>coefficientVoxel3D,infloatvoxelGridSize,infloat4voxelCorner,infloat4voxelSize,infloat4boundingBoxMin,infloat4boundingBoxSize,infloat4originalBoundingBoxMin){float4boundingBoxVoxelSize=boundingBoxSize;float4boundingBoxVoxelCorner=boundingBoxMin*voxelGridSize+voxelCorner;// probe grid is already converted to bounding box coordinateint3probeCoord=GetProbe3DCoordFromPosition(worldPos,voxelGridSize,boundingBoxVoxelCorner);int3offset[8]={int3(0,0,0),int3(0,0,1),int3(0,1,0),int3(0,1,1),int3(1,0,0),int3(1,0,1),int3(1,1,0),int3(1,1,1),};float3c[9];float3Lo[8]={float3(0,0,0),float3(0,0,0),float3(0,0,0),float3(0,0,0),float3(0,0,0),float3(0,0,0),float3(0,0,0),float3(0,0,0)};// near 8 probesfor(inti=0;i<8;i++){int3neighborCoord=probeCoord+offset[i];boolisInsideVoxel=IsProbeCoordInsideVoxel(neighborCoord,boundingBoxVoxelSize);if(!isInsideVoxel){Lo[i]=bakedGI;continue;}#ifdef TOROIDAL_ADDRESSINGint3voxelCoord=neighborCoord+(int3)boundingBoxMin.xyz;// Calculate relative coordinates within original bounding boxint3neighborProbeCoord=voxelCoord-int3(originalBoundingBoxMin.xyz);// Toroidal AddressingneighborProbeCoord=WrapInt3(neighborProbeCoord,boundingBoxSize.xyz);#elseint3neighborProbeCoord=neighborCoord;#endif// decode SH9 from 3D textureDecodeSHCoefficientFromVoxel3D(c,coefficientVoxel3D,neighborProbeCoord);Lo[i]=IrradianceSH9(c,normal);}// trilinear interpolationfloat3minCorner=GetProbePositionFromTexture3DCoord(probeCoord,voxelGridSize,boundingBoxVoxelCorner);float3rate=saturate((worldPos-minCorner)/voxelGridSize);float3color=TrilinearInterpolationFloat3(Lo,rate);returncolor;}
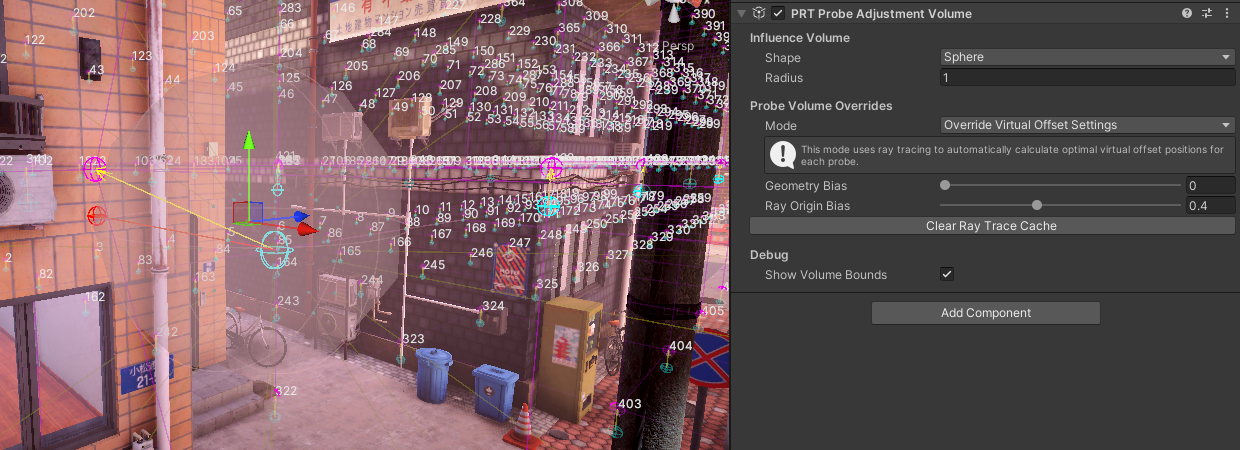
privateVector3CalculateRayTracedVirtualOffsetPosition(Vector3probePosition){constfloatDISTANCE_THRESHOLD=5e-5f;constfloatDOT_THRESHOLD=1e-2f;constfloatVALIDITY_THRESHOLD=0.5f;// 50% backface thresholdVector3[]sampleDirections=GetSampleDirections();Vector3bestDirection=Vector3.zero;floatmaxDotSurface=-1f;floatminDistance=float.MaxValue;intvalidHits=0;foreach(Vector3directioninsampleDirections){Vector3rayOrigin=probePosition+direction*rayOriginBias;Vector3rayDirection=direction;// Cast ray to find geometry intersectionif(Physics.Raycast(rayOrigin,rayDirection,outRaycastHithit,10f)){// Skip front facesif(hit.triangleIndex>=0)// Check if it's a valid hit{// Check if it's a back face by checking normal directionVector3hitNormal=hit.normal;floatdotSurface=Vector3.Dot(rayDirection,hitNormal);// If it's a front face, skip itif(dotSurface>0){validHits++;continue;}floatdistanceDiff=hit.distance-minDistance;// If distance is within thresholdif(distanceDiff<DISTANCE_THRESHOLD){// If new distance is smaller by at least threshold, or if ray is more colinear with normalif(distanceDiff<-DISTANCE_THRESHOLD||dotSurface-maxDotSurface>DOT_THRESHOLD){bestDirection=rayDirection;maxDotSurface=dotSurface;minDistance=hit.distance;}}}}}// Calculate validity (percentage of backfaces seen)floatvalidity=1.0f-validHits/(float)(sampleDirections.Length-1.0f);// Disable VO for probes that don't see enough backfaceif(validity<=VALIDITY_THRESHOLD)returnprobePosition;if(minDistance==float.MaxValue)minDistance=0f;// Calculate final offset positionfloatoffsetDistance=minDistance*1.05f+geometryBias;returnprobePosition+bestDirection*offsetDistance;}/// <summary>/// Get sample directions for ray tracing/// </summary>/// <returns>Array of normalized direction vectors</returns>privatestaticVector3[]GetSampleDirections(){// 3x3x3 - 1, excluding centerconstfloatk0=0f,k1=1f,k2=0.70710678118654752440084436210485f,k3=0.57735026918962576450914878050196f;returnnewVector3[]{// Top layer (y = +1)new(-k3,+k3,-k3),// -1 1 -1new(k0,+k2,-k2),// 0 1 -1new(+k3,+k3,-k3),// 1 1 -1new(-k2,+k2,k0),// -1 1 0new(k0,+k1,k0),// 0 1 0new(+k2,+k2,k0),// 1 1 0new(-k3,+k3,+k3),// -1 1 1new(k0,+k2,+k2),// 0 1 1new(+k3,+k3,+k3),// 1 1 1// Middle layer (y = 0)new(-k2,k0,-k2),// -1 0 -1new(k0,k0,-k1),// 0 0 -1new(+k2,k0,-k2),// 1 0 -1new(-k1,k0,k0),// -1 0 0// k0, k0, k0 - skip center position (which would be a zero-length ray)new(+k1,k0,k0),// 1 0 0new(-k2,k0,+k2),// -1 0 1new(k0,k0,+k1),// 0 0 1new(+k2,k0,+k2),// 1 0 1// Bottom layer (y = -1)new(-k3,-k3,-k3),// -1 -1 -1new(k0,-k2,-k2),// 0 -1 -1new(+k3,-k3,-k3),// 1 -1 -1new(-k2,-k2,k0),// -1 -1 0new(k0,-k1,k0),// 0 -1 0new(+k2,-k2,k0),// 1 -1 0new(-k3,-k3,+k3),// -1 -1 1new(k0,-k2,+k2),// 0 -1 1new(+k3,-k3,+k3),// 1 -1 1};}